Capture Atlas introduces some major changes in how the views of Capture behave and in this post we'd like to walk you through the background and reasoning behind these changes, while at the same time showing off some of the new features that make us so excited about Capture Atlas.
 Design views in retrospect
Since Capture 1.0, Capture has relied on a user interface split into four parts. Back in Capture 1.0 all four views were design views, and their functionality was locked in the sense that you had one top view, one front view, one section view and one perspective view. All properties and object manipulation took place in dialogs would appear on top of your design work and get in your way.
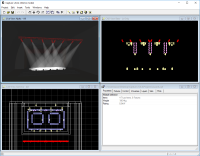
These flaws were adressed in Capture 3.0 (image on the right) which was the first Capture release where the bottom right part of the user interface was dedicated to your project and featured a multi-tab layout. With only three slots left for design views but a need for more than three projections, the user was allowed to change the type of the views and jump between top, front, section and perspective projections. This design has stayed with us through Capture 2005/Polar as well as Capture Argo.
The difference between 2D and 3D views
Before the introduction of Capture Atlas, Capture users have never been able to insert or move objects in a 3D view. For this reason it has often been necessary to have both 2D and 3D views open at the same time, so that while making adjustments in a 2D view, one could observe the effects of the changes in a 3D view at the same time. (By 2D view we mean a view where the camera direction is aligned with the X, Y or Z axis and the projection is orthographic, ie. without perspective.)
These restrictions created a philosophy of "2D plan views are for editing - 3D views are for visualization", a philosophy that also reflected on the way camera manipulation worked. While in 3D view it has always been possible to both panorate and rotate the camera around it's focus point, views in 2D mode defaulted to panoration and did not allow for any kind of rotation. With Capture Atlas we're eliminating these distinctions and introducing a whole new way of thinking.
All design views are 3D
By allowing object manipulation in 3D we have been able to completely remove the notion of "being in 2D or 3D". If transforming your design view from 2D to 3D doesn't render it useless for alterations, there is no need to protect you from doing so in the first place. In fact, with Capture Atlas we encourage all users to try doing more changes in 3D!
We have completely removed the view settings that jumped between Top, Front, Section, Perspective and Orthographic modes and now allow you to transition seamlessly between these viewing angles by manipulating the camera position. The key thing in making this possible has been providing an orthographic 3D wireframe system that allows for object manipulation.
As can be seen in this video, the default navigation behaviour of design views is now always to rotate around the camera's focus point. (For view manipulation that preserves the camera direction you would press Shift, just as before in 3D views.) The result is a user interface that is both more flexible and more consistent. Notice how the red navigator around the band transforms from the flat box of the original top view into a 3D box and how grabbing the top face of it allows moving the band as if in a top view, although the view is in 3D.
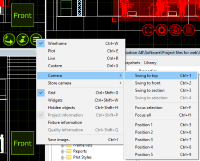
 While 2D is no longer a mode you work in that prevents you from ending up in 3D, there is of course still a need to efficently change a view into for instance a top or front view. For this purpose we have introduced the Camera view menu which has shortcuts to "swing" the view's camera into top, front and section positions, all mapped to the same keyboard shortcut locations as previously.
Other powerful additions have been made as well. The Focus functions let's you quickly set the focus position of the camera to either the selected object(s) or your entire design. For additional flexibility you can also record and recall up to 5 custom camera positions.
The pièce de résistance is the Swing to selection function though.
Swing to selection
There are times when working in 3D that you wish you were actually working in 2D instead. The prime example would be rigs with tilted and rotated trussed, where rearranging fixtures on such constructions used to be a real hassle.
The final video in this post illustrates the Swing to selection feature of Capture Atlas in action. Above the stage are two pieces of tilted box truss, with four moving heads on each. In the video, the Swing to selection function is applied to one of the tilted trusses, aligning the view with the truss. This makes repositioning the fixtures on it a breeze - it's simply done as if the truss had been rigged straight instead.
The benefits
There are many benefits to the new design view behaviour of Capture Atlas. The most obvious might be the ability to move things in 3D, especially in Live mode where the interaction of an object with lighting can be studied while the object is being moved. But by making it easier to get things done without having to have two views open, it also becomes more feasible to work in fullscreen. Finding new ways of optimizing your workflow is our passion after all!