8 Design Views
Capture has three design views, the Alpha, Beta and Gamma views.
8.1 Navigator
The Navigator is one of the main tools of capture. It is used for two primary functions - Navigation and Manipulation.

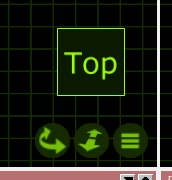
The navigation part of the Navigator is present in the bottom right corner of the Alpha, Beta and Gamma views. This Navigator is used to manipulate the view in terms of changing the camera viewing point and zoom within the view as well as accessing the view settings via the spanner button.
The First button, a curve with arrows, allows you to move around a view. Holding the Shift or Ctrl keys allows a different style of movement in the 3D views.
The second button is used to zoom in and out on the selected view. Holding the button and moving the mouse up or down will control the amount the camera is zoomed in or out.
The third button is used to access the settings for the selected view as we discussed earlier. Additional settings for each are available in the Design tab of the Project window.

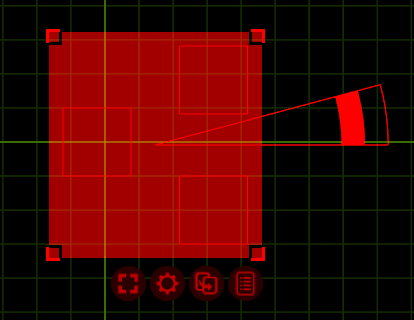
Whenever you select any objects, within any of the Alpha, Beta or Gamma views within Capture; a second type navigator appears. When objects are selected, they appear red with a a red grid around them that has some control buttons below it. This second type of navigator is used to assist in the manipulation of the objects.
Objects can be selected by clicking on them with the mouse. Use the Shift key to add objects to the selection and the Ctrl key to toggle individual object selection on and off. By click-dragging the mouse over a group of objects, you can select them all at a time. If you drag from the left to the right, the objects must lie completely within the region, but if you drag from the right to the left, it is enough for the objects to be partially inside the region in order to become selected.
Clicking and moving the mouse anywhere inside the Translation grip allows you to move objects around. This area is intentionally large so that it is easy to move items. While moving items, you can enable the ortho mode by pressing Shift key. Snapping in the sense of bringing items to a minimal distance is built in and activated during any translation, but is not triggered until after a short delay. When snapping is activate, the result of the snapping is illustrated with an alternate colour.
Clicking and moving the mouse inside a Distribution grip will allow you to spread out or bring together the selected objects over the given area in a proportional manner. The ortho mode is available here by using the Shift key as well. The Rotation anchor is used to rotate objects. It can be moved around to define the center of rotation and allows for both Individual rotation and Group rotation. Pressing the Shift key enables snapped rotation.
The first button is the selection menu button. It allows you to select or deselect everything, with the added “layer” option. Using the “layer” option will allow you to select or deselect everything but only in the current layer. Layers will be discussed in a later chapter.
The second button is the actions menu button. It displays a small list of possible operations relevant to the selected object(s). The list that appears is context sensitive, that is to say that selecting a Lighting Fixture will display different options in the list than that of a Truss. Each available option/command will be covered later in the relevant chapters.
The arrow button is used to drag objects out of one view to another. Using this button, the objects won’t actually move per say. The button is used primarily for patching fixtures. Select multiple fixtures in the order you wish to patch them and use the drag button to drag them onto a universe in the project window or on an open universe window. This functionality will be covered later in the relevant section.
You may also use the arrow button to drag the object to a new location in the same window, thereby making a copy.
The button with a list is the Quick Summery button. Pressing it when you have objects selected presents a popup window about the selected objects displaying key data about them. This button reveals the fixture control pane and is only visible when at least one lighting fixture is selected and the view is in Live mode.
8.2 DMX Control
It is possible to control a view using DMX. This is achieved by either manually assigning a Patch universe / channel or by dragging the view’s camera from a design view to a channel in a Universe view. The Patch mode option can be used to select the number of channels used by the camera. See Append A for details on the DMX channel layout.