19 Appendix
19.1 DMX Tables
19.1.1 Cameras
The cameras offer two DMX modes, Standard and Extended. The difference between these lies in the last two channels that allow for control of the current filter and scene of the camera’s view.
| Standard | Extended | Function | DMX Ranges | Note |
|---|---|---|---|---|
| 1 | 1 | Catalog | 0 - Unused 1-255 - Catalog 1 to 255 |
|
| 2 | 2 | Camera Position | 0 - Unused 1-255 - Camera Position 1 to 255 |
|
| 3 | 3 | Time Coarse | Transition time in hundredths of seconds, from 0 to 655,35 seconds |
|
| 4 | 4 | Time Fine | ||
| 5 | 5 | Dampening Coarse | 0% to 100% | |
| 6 | 6 | Dampening Fine | ||
| 7 | 7 | Curvature Coarse | 0% to 100% | |
| 8 | 8 | Curvature Fine | ||
| 9 | 9 | Ambient Coarse | 0% to 100% | |
| 10 | 10 | Ambient Fine | ||
| 11 | 11 | Exposure Coarse | -3EV to +3EV | |
| 12 | 12 | Exposure Fine | ||
| 13 | Filter | 0 - Unused 1-255 - Filters 1 to 255 |
(2) | |
| 14 | Scene | 0 - Unused 1-255 - Scenes 1 to 255 |
(3) |
The following two Legacy 16-Bit Standard and Legacy 16-Bit Extended modes were present before Capture 2022.
| Legacy 16-Bit, Standard |
Legacy 16-Bit, Extended |
Function | DMX Ranges | Note |
|---|---|---|---|---|
| 1 | 1 | X Coarse | -50m to +50m | (1) |
| 2 | 2 | X Fine | ||
| 3 | 3 | Y Coarse | -50m to +50m | (1) |
| 4 | 4 | Y Fine | ||
| 5 | 5 | Z Coarse | -50m to +50m | (1) |
| 6 | 6 | Z Fine | ||
| 7 | 7 | Pan Coarse | -180° to +180° | (1) |
| 8 | 8 | Pan Fine | ||
| 9 | 9 | Tilt Coarse | -180° to +180° | (1) |
| 10 | 10 | Tilt Fine | ||
| 11 | 11 | Pitch Coarse | -180° to +180° | (1) |
| 12 | 12 | Pitch Fine | ||
| 13 | 13 | Vertical Field of View Coarse | 5° to 90° | (1) |
| 14 | 14 | Vertical Field of View Fine | ||
| 15 | 15 | Ambient Coarse | 0% to 100% | |
| 16 | 16 | Ambient Fine | ||
| 17 | 17 | Exposure Coarse | -3EV to +3EV | |
| 18 | 18 | Exposure Fine | ||
| 19 | Filter | 0 - 3, Filter 1 4 - 7, Filter 2 … 248 - 251, Filter 63 252 - 255, Filter 64 |
(2) | |
| 20 | Scene | 0 - 3, Scene 1 4 - 7, Scene 2 … 248 - 251, Scene 63 252 - 255, Scene 64 |
(3) |
The following two Legacy 8-Bit Standard and Legacy 8-Bit Extended modes were present before Capture 2020.
| Legacy 8-Bit, Standard |
Legacy 8-Bit, Extended |
Function | DMX Ranges | Note |
|---|---|---|---|---|
| 1 | 1 | X Coarse | -50m to +50m | (1) |
| 2 | 2 | X Fine | ||
| 3 | 3 | Y Coarse | -50m to +50m | (1) |
| 4 | 4 | Y Fine | ||
| 5 | 5 | Z Coarse | -50m to +50m | (1) |
| 6 | 6 | Z Fine | ||
| 7 | 7 | Pan Coarse | -180° to +180° | (1) |
| 8 | 8 | Pan Fine | ||
| 9 | 9 | Tilt Coarse | -180° to +180° | (1) |
| 10 | 10 | Tilt Fine | ||
| 11 | 11 | Pitch Coarse | -180° to +180° | (1) |
| 12 | 12 | Pitch Fine | ||
| 13 | 13 | (unused) | ||
| 14 | 14 | Ambient | 0% to 100% | |
| 15 | 15 | Lighting | 0% to 100% | |
| 16 | 16 | (unused) | ||
| 17 | Filter | 0 - 3, Filter 1 4 - 7, Filter 2 … 248 - 251, Filter 63 252 - 255, Filter 64 |
(2) | |
| 18 | Scene | 0 - 3, Scene 1 4 - 7, Scene 2 … 248 - 251, Scene 63 252 - 255, Scene 64 |
(3) |
- Can be overridden by the user in Capture.
- Mapping of project filters to indexes is done by the user in Capture.
- Mapping of project scenes to indexes is done by the user in Capture.
19.1.2 Smoke Boxes
| Standard | Function | DMX Ranges |
|---|---|---|
| 1 | Density Coarse | 0% to 100% |
| 2 | Density Fine | |
| 3 | Variation Coarse | 0% to 100% |
| 4 | Variation Fine |
19.1.3 Media Players
| Full | Function | DMX Ranges |
|---|---|---|
| 1 | Control | 0 - 7, Pause 8 - 15, Play 16 - 23, Replay (Play again from start) 24 - 31, Stop (32 - 255, Unused) |
| 2 | Selection | 0, Playlist entry 1 1, Playlist entry 2 .. 255, Playlist entry 256 |
| Legacy | Function | DMX Ranges |
|---|---|---|
| 1 | Control | 0 - 7, Pause 8 - 15, Play 16 - 23, Replay (Play again from start) 24 - 31, Stop (32 - 255, Unused) |
| 2 | Selection | 0 - 31, Playlist entry 1 32 - 63, Playlist entry 2 64 - 95, Playlist entry 3 96 - 127, Playlist entry 4 128 - 159, Playlist entry 5 160 - 191, Playlist entry 6 192 - 223, Playlist entry 7 224 - 255, Playlist entry 8 |
19.1.4 DMX Movers
| 16-bit XYZ | Function | DMX Ranges | Note |
|---|---|---|---|
| 1 | X Coarse | 0% to 100% | (1) |
| 2 | X Fine | ||
| 3 | Y Coarse | 0% to 100% | (1) |
| 4 | Y Fine | ||
| 5 | Z Coarse | 0% to 100% | (1) |
| 6 | Z Fine |
| 8-bit XYZ | Function | DMX Ranges | Note |
|---|---|---|---|
| 1 | X | 0% to 100% | (1) |
| 2 | Y | 0% to 100% | (1) |
| 3 | Z | 0% to 100% | (1) |
| 16-bit X | Function | DMX Ranges | Note |
|---|---|---|---|
| 1 | X Coarse | 0% to 100% | (1) |
| 2 | X Fine |
| 8-bit X | Function | DMX Ranges | Note |
|---|---|---|---|
| 1 | X | 0% to 100% | (1) |
| 16-bit Y | Function | DMX Ranges | Note |
|---|---|---|---|
| 1 | Y Coarse | 0% to 100% | (1) |
| 2 | Y Fine |
| 8-bit Y | Function | DMX Ranges | Note |
|---|---|---|---|
| 1 | Y | 0% to 100% | (1) |
| 16-bit Z | Function | DMX Ranges | Note |
|---|---|---|---|
| 1 | Z Coarse | 0% to 100% | (1) |
| 2 | Z Fine |
| 8-bit Z | Function | DMX Ranges | Note |
|---|---|---|---|
| 1 | Z | 0% to 100% | (1) |
- Actual ranges are defined inside Capture in terms of meters or feet.
19.1.5 DMX Rotators
| Alpha 16-bit | Function | DMX Ranges | Note |
|---|---|---|---|
| 1 | Alpha Coarse | 0% to 100% | (1) |
| 2 | Alpha Fine |
| Alpha 8-bit | Function | DMX Ranges | Note |
|---|---|---|---|
| 1 | Alpha | 0% to 100% | (1) |
| Alpha & Speed 16-bit | Function | DMX Ranges | Note |
|---|---|---|---|
| 1 | Alpha Coarse | 0% to 100% | (2) |
| 2 | Alpha Fine | ||
| 3 | Speed Coarse | 0 - 2559, Fast to slow 2560 - 33791, Reverse continuous, fast to slow 33792 - 34303, Standstill 34304 – 65535, Forward continuous, slow to fast |
(3) |
| 4 | Speed Fine |
| Alpha & Speed 8-bit | Function | DMX Ranges | Note |
|---|---|---|---|
| 1 | Alpha | 0% to 100% | (2) |
| 2 | Speed | 0 - 9, Fast to slow 10 - 131, Reverse continuous rotation, fast to slow 132 - 133, Standstill 134 - 255, Forward continuous rotation, slow to fast |
(3) |
- Actual ranges are defined inside Capture in terms of meters or feet.
- Actual range is defined inside Capture in terms of degrees.
- Speed is defined in terms of the time a revolution takes. The slow speed is 120s per revolution and the fast speed is 0.1s per revolution. Ie. if the range of the rotator is 720°, the fast speed is 720° / 120s = 6° / s and the slow speed is 720° / 0.1s = 7200° / s.
19.1.6 Special effects
These include CO2 jets, flame jets and water jets. The term “power” refers to the valve of CO2 and flame jets or the pump of water jets.
| Power 8-bit | Function | DMX Ranges | Note |
|---|---|---|---|
| 1 | Power | 0% to 100% |
| Power & Tilt 8-bit | Function | DMX Ranges | Note |
|---|---|---|---|
| 1 | Power | 0% to 100% | |
| 2 | Tilt | -55° to +55° | (1) |
| Power, Pan & Tilt 8-bit | Function | DMX Ranges | Note |
|---|---|---|---|
| 1 | Power | 0% to 100% | |
| 2 | Pan | -180° to +180° | (1) |
| 3 | Tilt | -55° to +55° | (1) |
| Power, Pan, Pan Speed & Tilt 8-bit | Function | DMX Ranges | Note |
|---|---|---|---|
| 1 | Power | 0% to 100% | |
| 2 | Pan | -180° to +180° | (1) |
| 3 | Pan Speed | 0 - 9, Maximum 10 - 131, Reverse continuous rotation, fast to slow 132 - 133, Standstill 134 - 255, Forward continuous rotation, slow to fast |
|
| 4 | Tilt | -55° to +55° | (1) |
| Tilt & Power 8-bit | Function | DMX Ranges | Note |
|---|---|---|---|
| 1 | Tilt | -55° to +55° | (1) |
| 2 | Power | 0% to 100% |
| Pan, Tilt & Power 8-bit | Function | DMX Ranges | Note |
|---|---|---|---|
| 1 | Pan | -180° to +180° | (1) |
| 2 | Tilt | -55° to +55° | (1) |
| 3 | Power | 0% to 100% |
| Power 16-bit | Function | DMX Ranges | Note |
|---|---|---|---|
| 1 | Power Coarse | 0% to 100% | |
| 2 | Power Fine |
| Power & Tilt 16-bit | Function | DMX Ranges | Note |
|---|---|---|---|
| 1 | Power Coarse | 0% to 100% | |
| 2 | Power Fine | ||
| 3 | Tilt Coarse | -55° to +55° | (1) |
| 4 | Tilt Fine |
| Power, Pan & Tilt 16-bit | Function | DMX Ranges | Note |
|---|---|---|---|
| 1 | Power Coarse | 0% to 100% | |
| 2 | Power Fine | ||
| 3 | Pan Coarse | -180° to +180° | (1) |
| 4 | Pan Fine | ||
| 5 | Tilt Coarse | -55° to +55° | (1) |
| 6 | Tilt Fine |
| Power, Pan, Pan Speed & Tilt 16-bit | Function | DMX Ranges | Note |
|---|---|---|---|
| 1 | Power Coarse | 0% to 100% | |
| 2 | Power Fine | ||
| 3 | Pan Coarse | -180° to +180° | (1) |
| 4 | Pan Fine | ||
| 5 | Pan Speed Coarse | 0 - 2559, Maximum 2560 - 33791, Reverse continuous rotation, fast to slow 33792 - 34303, Standstill 34304 - 65535, Forward continuous rotation, slow to fast |
|
| 6 | Pan Speed Fine | ||
| 7 | Tilt Coarse | -55° to +55° | (1) |
| 8 | Tilt Fine |
| Tilt & Power 16-bit | Function | DMX Ranges | Note |
|---|---|---|---|
| 1 | Tilt Coarse | -55° to +55° | (1) |
| 2 | Tilt Fine | ||
| 3 | Power Coarse | 0% to 100% | |
| 4 | Power Fine |
| Pan, Tilt & Power 16-bit | Function | DMX Ranges | Note |
|---|---|---|---|
| 1 | Pan Coarse | -180° to +180° | (1) |
| 2 | Pan Fine | ||
| 3 | Tilt Coarse | -55° to +55° | (1) |
| 4 | Tilt Fine | ||
| 5 | Power Coarse | 0% to 100% | |
| 6 | Power Fine |
- Pan and tilt ranges can be defined inside Capture.
19.2 Pan & Tilt Calibration Guide
In order to help us correct issues with moving head fixture orientation, we may ask you to follow this guide.
19.2.1 Before You Start
Before you start the pan & tilt calibration procedure, please first make sure that in the settings of the fixture, no pan and/or tilt invert settings are active and that no overrides for its pan and/or tilt range are active. Also make sure that no pan and/or tilt settings are active in the DMX controller you are using during the calibration.
This guide assumes and requires that the fixture you are working with is positioned on the floor in front of you while observing it.
19.2.1.1 Position the Fixture
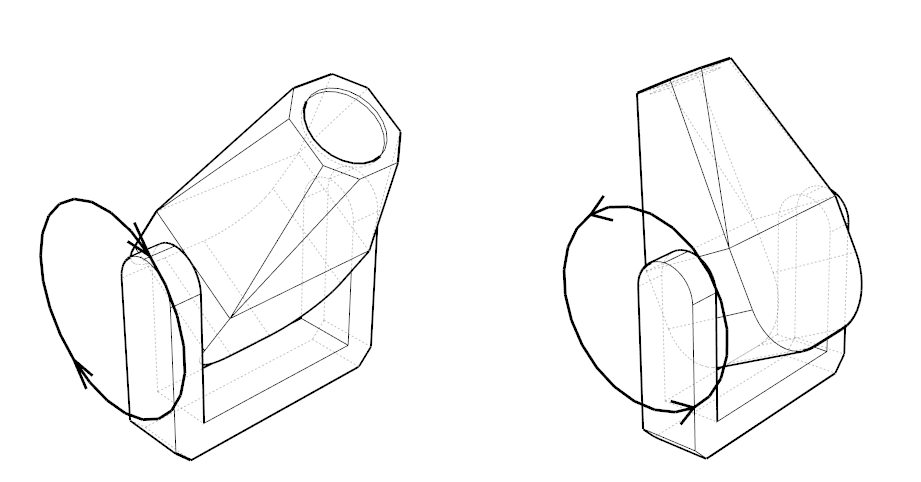
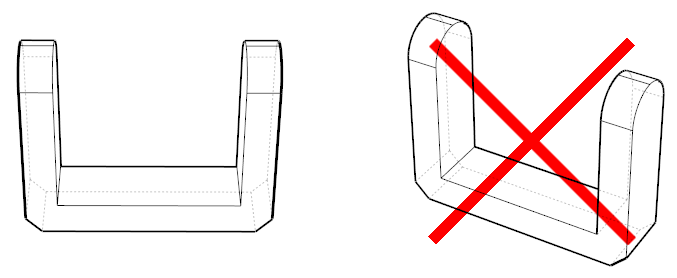
Start with setting both pan and tilt to 50%. Position yourself or the fixture so that your shoulders are parallel with the yoke, as follows:
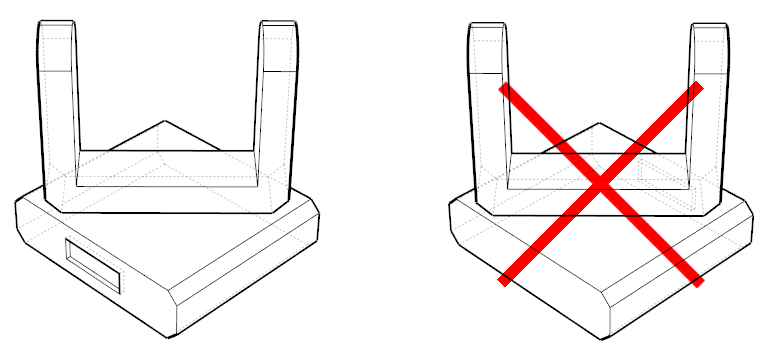
If at this point the display on the base of the fixture is facing away from you, either position yourself on the other side of the fixture or rotate the fixture 180 degrees (in either direction), as follows:
19.2.1.2 Pan Calibration
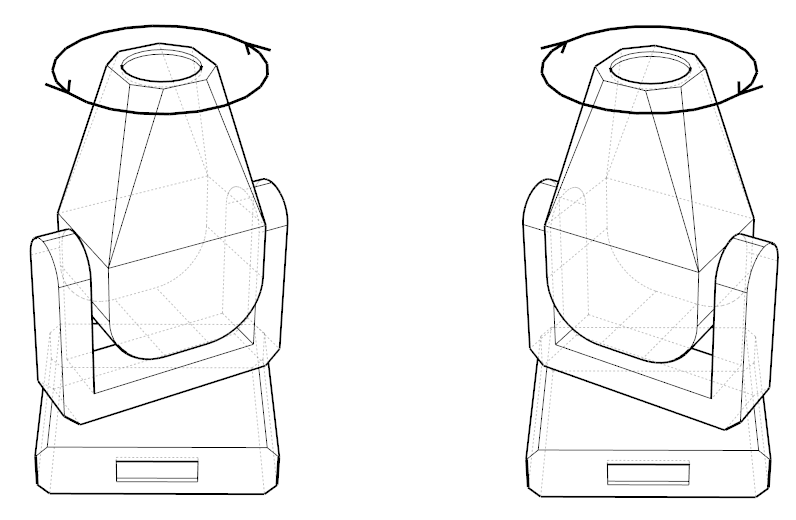
Question 1 – Now increase the pan parameter of the fixture from 50% towards 100%. Does the yoke rotate in a clockwise or anti-clockwise direction?
Example below: anti-clockwise rotation (left image) and clockwise rotation (right image) as follows.
Set the fixture’s pan parameter to 50% again.
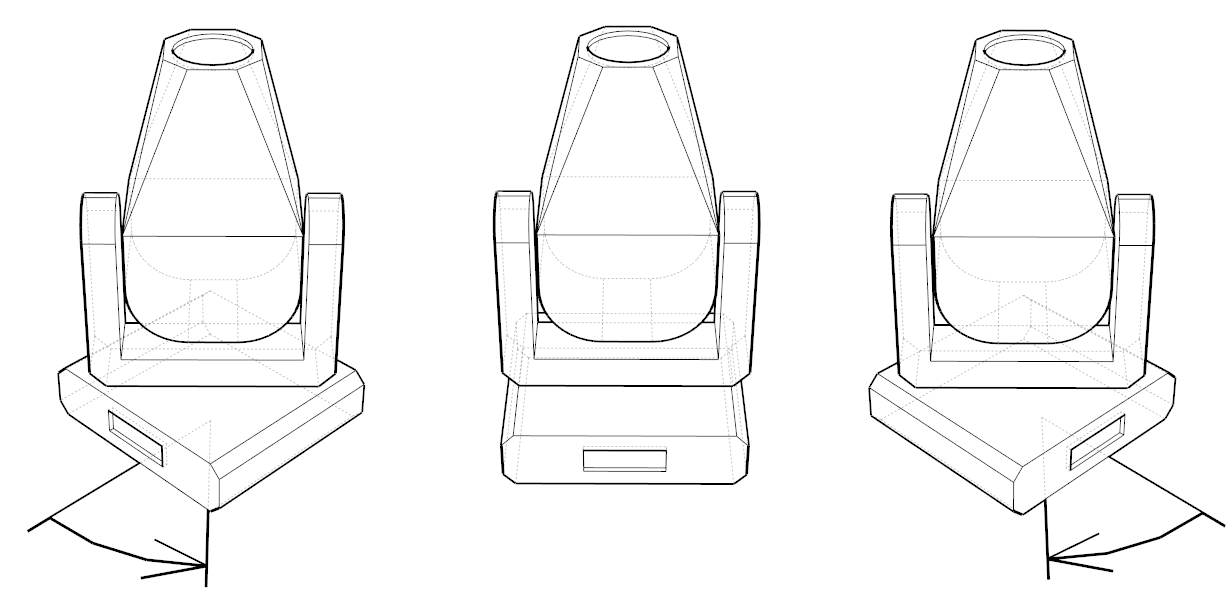
Question 2 – How many degrees would you need to rotate the base of the fixture so that its display faces you directly?
Example below: +45 degrees (left image), 0 degrees (center image) and -45 degrees (right image).
19.3 Prism Facet Definition Guide
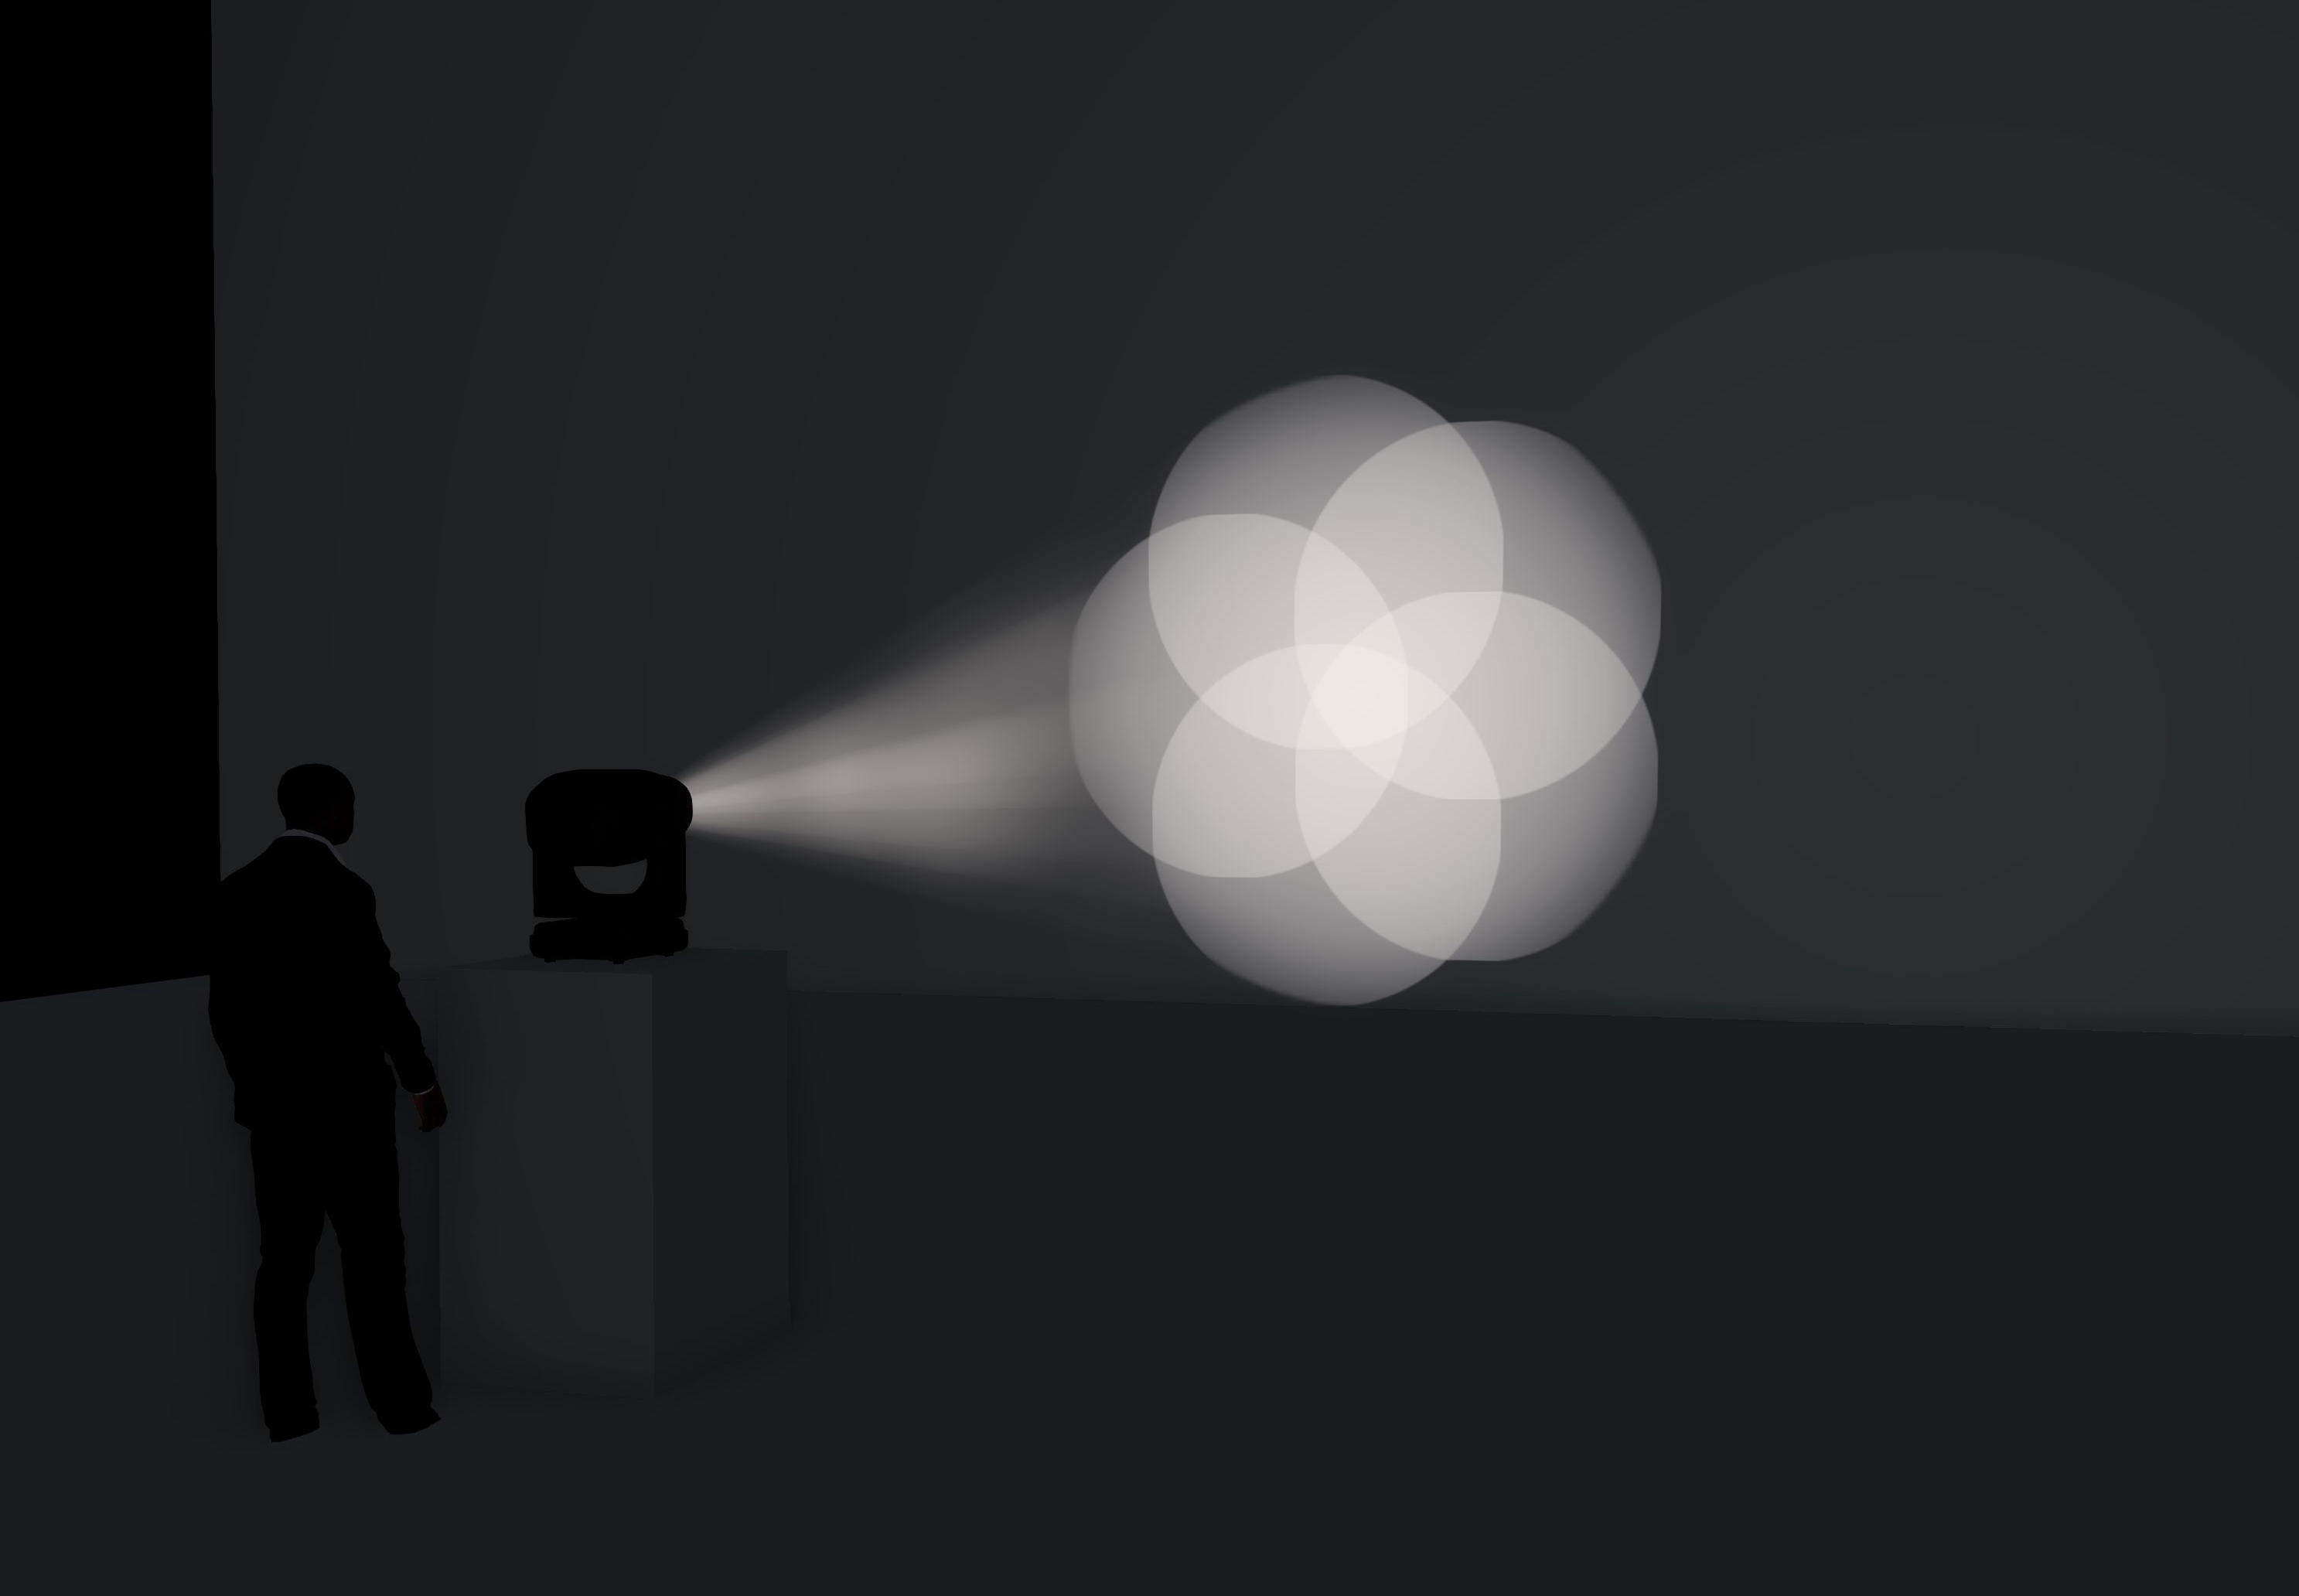
Place your fixture in a specific position against the projection wall. Keep this distance stable across the process. The beam should be parallel to the ground so that the projection on the wall is not distorted.

Open the light without any colour, gobo, or effect, in plain white. If the fixture has a zoom range, prefer the middle zoom range, and keep the same zoom setting across the process.
Focus the beam to be sharp.
Take a photo of the projected beam on the wall (all photos should be taken from the same spot and close to the fixture, so the photos are not taken at an angle).
Insert the prism and verify that the focus is still sharp. If not, adjust the focus as required.
Take a photo of the projected beam on the wall and send it to us. In case the size of the projection has been altered significantly after adjusting the focus, please inform us.
19.4 Protocols
19.4.1 Lighting Console Connectivity
| Protocol | Link Type | macOS | Windows |
|---|---|---|---|
| Art-Net | Ethernet | Yes | Yes |
| CITP | Ethernet | Yes | Yes |
| Compulite VC | Ethernet | Yes | Yes |
| EntTec DMX USB Pro Mk1 & Mk2 | USB Devices | Yes | Yes |
| ETC Eos 1 | Ethernet / OSC | Yes | Yes |
| MA-Net2 2 | Ethernet | Yes | |
| MA-Net3 3 | Software Driver | Yes | Yes |
| Streaming ACN | Ethernet | Yes | Yes |
1 The IP address of the EOS console needs to be entered in Options. Bidirectional channel selection and pan/tilt feedback is supported.
2 Requires MA software version 2.9. To enable, use the Configure MA-Net.. command in the Universes Tab.
3 Requires installing plugin software for grandMA3 viz-key.
To install the grandMA3 viz-key plugin software, start the Plugin updater in the Connectivity Tab of the Options window and initiate the software update from the grandMA3 software. Multiple plugin versions can be installed simultaneously, but the version selected must match your grandMA3 software.
Note that most protocols have configuration options available under the Connectivity Tab of the Options window.
19.4.2 Other Protocols
| Protocol | Purpose | macOS | Windows |
|---|---|---|---|
| Blacktrax RTTrP | Tracking | Yes | Yes |
| CITP / CAEX | Laser | Yes | Yes |
| CITP / MSEX | Video | Yes | Yes |
| Kinesys K2 | Tracking | Yes | Yes |
| LaserAnimation | Laser | Yes | Yes |
| NewTek NDI | Video | Yes | Yes |
| OSC | Automation | Yes | Yes |
| Pangolin Beyond | Laser | Yes | Yes |
| PosiStageNet | Tracking | Yes | Yes |
19.4.3 OSC
Capture supports OSC 1.0 and 1.1 over TCP and UDP. The default port is 4004.
OSC address patterns and OSC bundles are not supported.
Verbose logging can be configured, e.g. to support troubleshooting.
19.4.3.2 Camera Positions
⤵️ /getCatalogs results in a ↩︎️ /catalogs response with one int32 number per numbered catalog.
⤵️ /catalog/{n}/getName results in a ↩︎️ /catalog/{n}/name + string name response.
⤵️ /catalog/{n}/getPositions results in a ↩︎️ /catalog/{n}/positions response with one int32 number per numbered position.
⤵️ /catalog/{n}/position/{m}/getName results in a ↩︎️ /catalog/{n}/position/{m}/name + string name response.
Here n denotes a catalog number and m denotes a position number.
Example: /catalog/2/position/3/getName (gets the name of camera position 3 in catalog number 2).
19.4.3.3 View Properties
⤵️ /view/{0-2|live}/ambientLighting + float32 [0, 1]
⤵️ /view/{0-2|live}/automaticExposure + bool
⤵️ /view/{0-2|live}/bloom + float32 [0, 1]
⤵️ /view/{0-2|live}/exposureAdjustment + float32 [-3, 3]
⤵️ /view/{0-2|live}/fillLighting + float32 [0, 1]
⤵️ /view/{0-2|live}/hueClamp + float32 [0, 1]
⤵️ /view/{0-2|live}/laserFlickerEffect + bool
⤵️ /view/{0-2|live}/whiteBalance + float32 [2500, 10000]
These methods change the corresponding view properties.
Indexes 0 to 2 correspond to the Alpha, Beta and Gamma views. The live notation is a convenience for addressing the first (lowest index) view currently in live mode.
Example: /view/live/bloom + float 0.3 (sets bloom to 30% in the first view currently in live mode)
19.4.3.4 View Status
⤵️ /view/live/getStatus results in a ↩︎️ /view/live/status + int32 index [-1, 2] + float cameraX + float cameraY + float cameraZ + float focusX + float focusY + float focusZ response.
Indexes 0 to 2 correspond to the Alpha, Beta and Gamma views. An index of -1 means that no view is currently in live mode.
19.4.3.5 View Camera Positions
⤵️ /view/{0-2|live}/position + int32 catalogNr [1, 255] + int32 positionNr [1, 255]
⤵️ /view/{0-2|live}/position + int32 catalogNr [1, 255] + int32 positionNr [1, 255] + float32 time [0, 600 seconds]
⤵️ /view/{0-2|live}/position + int32 catalogNr [1, 255] + int32 positionNr [1, 255] + float32 time [0, 600 seconds] + float32 dampening [0, 1]
⤵️ /view/{0-2|live}/position + int32 catalogNr [1, 255] + int32 positionNr [1, 255] + float32 time [0, 600 seconds] + float32 dampening [0, 1] + float32 curvature [0, 1]
These methods trigger a camera position change for a view.
Note that the time, dampening and curvature arguments are optional. When omitted, these defaults are used: time=0 seconds (instant transition), dampening=0 and curvature=0.
Indexes 0 to 2 correspond to the Alpha, Beta and Gamma views. The live notation is a convenience for addressing the first (lowest index) view in live mode.
19.5 Administrative Licensing
It is possible to both install and uninstall licence key files for all users of a computer by running Capture from the command line with the arguments described below.
19.5.1 Installation
On Windows, run Capture.exe -installKeyFile <key file> in a command window or PowerShell with administrative privileges, adjusting the paths to Capture.exe and key_file as necessary.
On macOS, run "Capture 2024.app/Contents/MacOS/Capture" -installKeyFile <key file> in a terminal with administrative privileges, adjusting the paths to Capture 2024.app and key_file as necessary.
On success, Capture returns 0. On failure, Capture returns 1 and prints a single line error message to standard output.
Important: On Windows, Capture.exe is a not a command line utility. In order to acquire the contents of the output it needs to be redirected and you need to wait for the process to exit before analysing the result.
Important: In order for the unlocking to work during installation, Capture needs to be able to make an http call to www.capture.se and the licence key file must have been enabled for automated unlocking.
19.5.2 Uninstallation
On Windows, run Capture.exe -uninstallKeyFile in a command window or PowerShell with administrative privileges.
On macOS, run "Capture 2024.app/Contents/MacOS/Capture" -uninstallKeyFile in a terminal with administrative privilege.
On success, Capture returns 0. On failure, Capture returns 1 and prints a single line error message to standard output.
Important: In order for the locking to work during installation, Capture needs to be able to make an http call to www.capture.se. If this fails, the lock code will be presented on standard output.
